웹디자인 강의
3DSMax 귀여운 물고기를 만들자(1)
2004.02.08 15:18
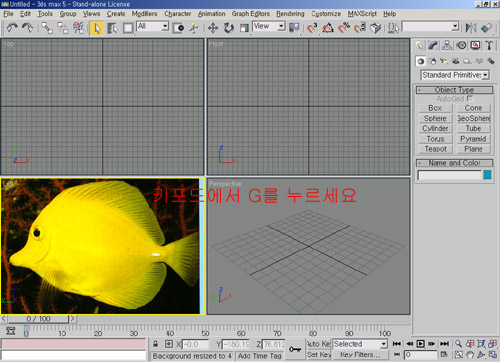
귀여운 물고기를 만들어 보겠습니다^^
물고기 이미지
http://HAE.f3i.net/bbs/study/tang.jpg
완성
Left 화면이 활성화(노란 테두리가되는것;) 되어있는지 본뒤
views - viewport background 열어주세요
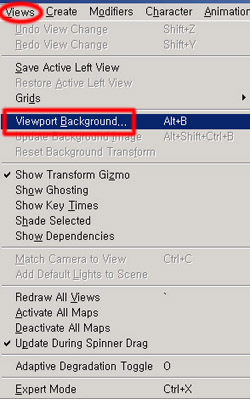
새창이 떴죠?
files에서 물고기 이미지를 찾아열어주고
순서대로 체크한뒤 OK
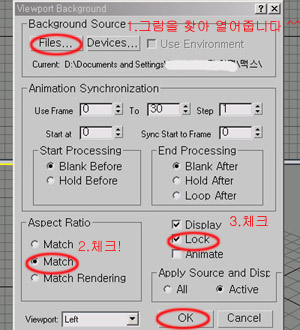
Left 화면에 물고기 그림이 나왔죠?
만약 격자모양 그물(그리드)이 있다면 키보드에서 "G"를 눌러주세요
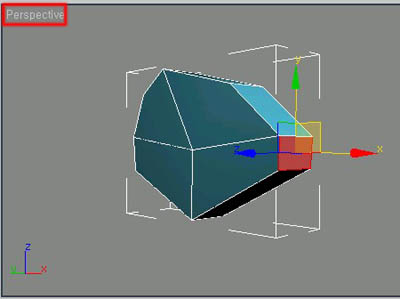
박스로 물고기 그림위에 맞추며 드래그로 상자를 그림니다
왼쪽에 L, W, H, 값을 2*2*1 로 합니다
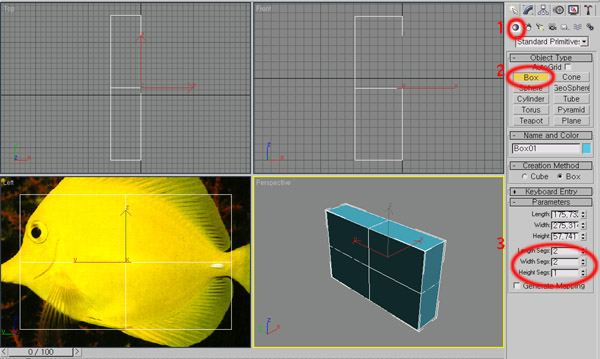
만약 perspective 화면에서 나눠지는 하얀선이 안보이면 키보드에서 F4를 누르세요
박스를 다그렸으면
Left 화면에서 오른쪽 마우스 클릭 하면
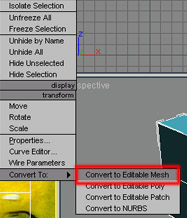
이게뜨죠? 클릭!
그럼
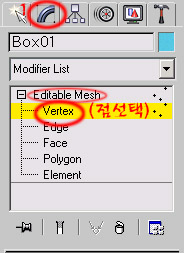 이것처럼 나옵니다 vertex를 선택
Left 화면에서 파란 점들이 보이죠?
점들을 물고기 모양에 맞게 옮겨줌니다
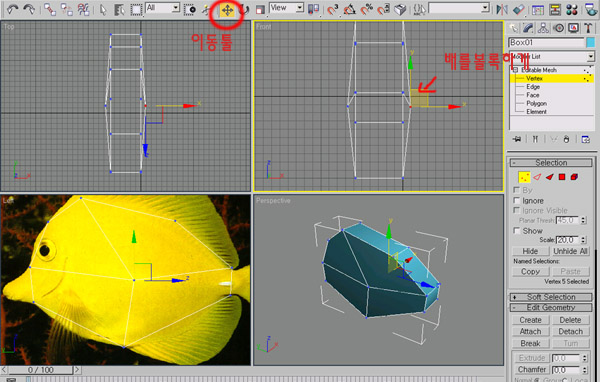
*********점을 옮길때 주의할점..! ***************************************************
1 점을 클릭을 하지 말고 드래그를 합니다 (이유는 양쪽점을 다 선택하기 위해)
2 이동툴로 움직입니다
(만약! 위아래나 좌우로 밖에 안움직여져요~ 하시는 분덜은 ..
이것이 이동할때 쓰는 gizmo 입니다(views-show transform gizmo 체크)
마우스를 gizmo의 X축에 갖다노면 좌우로..Y축에 놓면 상하로..그리고 네모에 놓으면 자유이동 입니다!!
************************************************************************
자 물고기 배도 뽈록 튀어나오게 front화면에서 살짝 이동해줍니다
형체가 되었죠?
여기서 꼬리 입 지느러미 를 쫙 쫙 뽑아낼껏입니다ㅋ
polygon(면) 클릭
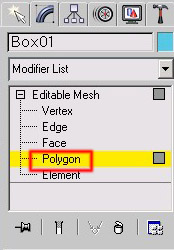
perspective 화면에서 회전을 하여 꼬리가 될 부분을 클릭 해주면 빨갛게 그부분이 되었죠?
회전툴은
이것 입니다 클릭!해서
perspective 화면에서만! 돌리세요~~
***회전툴 사용시 주의;;***********
1.꼭 perspective 화면에서만 돌리고 만약 실수로 다른 화면에서 돌려서 화면이 일그러졌다!^0^
하시는 분은 Left는 키보드 "L" front는 키보드 "F" top은 키보드 "T"를 누르세요~
2.회전툴을 누르면 perspective에서 노란 원이 생기죠? 원안!에서만 마우스로 움직이면서 돌려야 합니다
************************************************
꼬리가 될면을 선택하셨음 이제 Extrude로 뽑아내세요
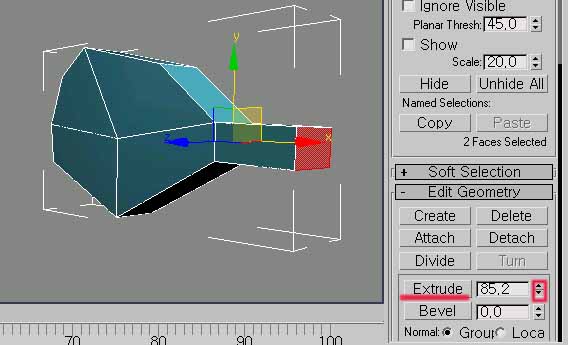 클릭해서 위쪽으로 쭉 드래그를 하면 수치값이 올라 갑니다
스케일 툴로 front화면에서 위아래로 쫙 넓힘니다 Lift화면에 사진을 보면서 딱맞게 합니다
gizmo가 옆화면 처럼 되게 마우스를 갖다댑니다
*********스케일툴 설명**********************
gizmo가 옆화면처럼 되면 전체 크기 조절
gizmo가 옆화면처럼 상하 좌우만 조절됩니다(다르죠?)
**************************************************
물고기 입도 마친가지로 Extrude와 스케일툴로 뽑아냅니다
이제 등지느러미를 뽑아낼 차례입니다
Extrude를 살짝만 뽑아 줍니다
(등지느러미를 선택할때는 Ctrl를 사용합니다 Ctrl은 동시에 2개를 선택할수 있습니다)
스케일 툴로
이렇게 합니다
그럼
그림처럼 스케일툴로 얇게 만들어 줍니다
그다음 Extrude로 쫙뽑아 냅니다
Editable mesh 에서 vertex 클릭 한담에 Left화면에서 점을 그림에 맞게조절
밑에 작은 지느러미도 위와 같은 방법으로 Extrude로 살짝 뽑아낸뒤 스케일툴로 얇게 만든뒤 다시 Extrude로 쫙 뽑아 냅니다
마찬가지 작은 지느러미도 점 조절
,,다음 강좌로..
물고기 이미지
http://HAE.f3i.net/bbs/study/tang.jpg
완성
Left 화면이 활성화(노란 테두리가되는것;) 되어있는지 본뒤
views - viewport background 열어주세요
새창이 떴죠?
files에서 물고기 이미지를 찾아열어주고
순서대로 체크한뒤 OK
Left 화면에 물고기 그림이 나왔죠?
만약 격자모양 그물(그리드)이 있다면 키보드에서 "G"를 눌러주세요
박스로 물고기 그림위에 맞추며 드래그로 상자를 그림니다
왼쪽에 L, W, H, 값을 2*2*1 로 합니다
만약 perspective 화면에서 나눠지는 하얀선이 안보이면 키보드에서 F4를 누르세요
박스를 다그렸으면
Left 화면에서 오른쪽 마우스 클릭 하면
이게뜨죠? 클릭!
그럼
이것처럼 나옵니다 vertex를 선택Left 화면에서 파란 점들이 보이죠?
점들을 물고기 모양에 맞게 옮겨줌니다
*********점을 옮길때 주의할점..! ***************************************************
1 점을 클릭을 하지 말고 드래그를 합니다 (이유는 양쪽점을 다 선택하기 위해)
2 이동툴로 움직입니다
(만약! 위아래나 좌우로 밖에 안움직여져요~ 하시는 분덜은 ..
이것이 이동할때 쓰는 gizmo 입니다(views-show transform gizmo 체크)마우스를 gizmo의 X축에 갖다노면 좌우로..Y축에 놓면 상하로..그리고 네모에 놓으면 자유이동 입니다!!
************************************************************************
자 물고기 배도 뽈록 튀어나오게 front화면에서 살짝 이동해줍니다
형체가 되었죠?
여기서 꼬리 입 지느러미 를 쫙 쫙 뽑아낼껏입니다ㅋ
polygon(면) 클릭
perspective 화면에서 회전을 하여 꼬리가 될 부분을 클릭 해주면 빨갛게 그부분이 되었죠?
회전툴은
이것 입니다 클릭!해서
perspective 화면에서만! 돌리세요~~
***회전툴 사용시 주의;;***********
1.꼭 perspective 화면에서만 돌리고 만약 실수로 다른 화면에서 돌려서 화면이 일그러졌다!^0^
하시는 분은 Left는 키보드 "L" front는 키보드 "F" top은 키보드 "T"를 누르세요~
2.회전툴을 누르면 perspective에서 노란 원이 생기죠? 원안!에서만 마우스로 움직이면서 돌려야 합니다
************************************************
꼬리가 될면을 선택하셨음 이제 Extrude로 뽑아내세요
클릭해서 위쪽으로 쭉 드래그를 하면 수치값이 올라 갑니다스케일 툴로 front화면에서 위아래로 쫙 넓힘니다 Lift화면에 사진을 보면서 딱맞게 합니다
gizmo가 옆화면 처럼 되게 마우스를 갖다댑니다*********스케일툴 설명**********************
gizmo가 옆화면처럼 되면 전체 크기 조절
gizmo가 옆화면처럼 상하 좌우만 조절됩니다(다르죠?)
**************************************************
물고기 입도 마친가지로 Extrude와 스케일툴로 뽑아냅니다
이제 등지느러미를 뽑아낼 차례입니다
Extrude를 살짝만 뽑아 줍니다
(등지느러미를 선택할때는 Ctrl를 사용합니다 Ctrl은 동시에 2개를 선택할수 있습니다)
스케일 툴로
이렇게 합니다
그럼
그림처럼 스케일툴로 얇게 만들어 줍니다
그다음 Extrude로 쫙뽑아 냅니다
Editable mesh 에서 vertex 클릭 한담에 Left화면에서 점을 그림에 맞게조절
밑에 작은 지느러미도 위와 같은 방법으로 Extrude로 살짝 뽑아낸뒤 스케일툴로 얇게 만든뒤 다시 Extrude로 쫙 뽑아 냅니다
마찬가지 작은 지느러미도 점 조절
,,다음 강좌로..
| 번호 | 제목 | 글쓴이 | 날짜 | 조회 수 |
|---|---|---|---|---|
| 공지 | 공지 강좌를 올리기전 공지사항을 읽어주세요 [12] | Eccen | 2004.12.15 | 81197 |
| » |
귀여운 물고기를 만들자(1)
[2]
| 서니 | 2004.02.08 | 11761 |
| 1574 |
붓으로 찍은 점 만들기
[14]
| LitQoo | 2004.02.06 | 14552 |
| 1573 |
스프링 만들기~
[13]
| Budge,V. | 2004.02.05 | 11863 |
| 1572 |
[기초팁]블랜딩 옵션만으로 깔끔한 버튼 만들기 #2
[27]
| 양군푸로독션 | 2004.02.04 | 21922 |
| 1571 |
[포토샵] 일러스트 비슷한거 그리기
[15]
| 8mile | 2004.02.04 | 14766 |
| 1570 |
밤하늘에 작은달과 구름~
[9]
| PlasmaG | 2004.02.04 | 11086 |
| 1569 |
바다에 폭풍치는 그림 그리기
[8]
| 경환돌이 | 2004.02.03 | 10159 |
| 1568 |
[CS]"맛좋고 건강에도 좋은 토마토 이야기 표지" 구성
[14]
| hozz호찌 | 2004.02.02 | 9950 |
| 1567 |
펜툴의 파워!!
[4]
| 강용환 | 2004.02.02 | 15145 |
| 1566 |
레이어창 이제 마스터하자!
[5]
| NzeoZen | 2004.02.02 | 8022 |
| 1565 |
신비스러운[?]크리스탈 비스무리한 것 만들어 보기
[13]
| NzeoZen | 2004.02.02 | 13038 |
| 1564 |
얼음같은 문자 만들기
[3]
| NzeoZen | 2004.02.02 | 10560 |
| 1563 |
사람지우기
[14]
| 강용환 | 2004.02.02 | 13127 |
| 1562 |
잿빛의 건물들(?)을 만들어보자.
[15]
| Eniun | 2004.02.01 | 8692 |
| 1561 |
절대반지 만들기~☆
[7]
| ⓒe~☆ | 2004.02.01 | 12256 |
| 1560 |
엽기강좌..열매맨 만들기''
[12]
| 쥬다스 | 2004.02.01 | 6776 |
| 1559 |
[재업강좌] 실로 칭칭감긴듯한 글씨
[4]
| 위스노우 | 2004.02.01 | 8761 |
| 1558 |
짜놓은 물감....?
[9]
| Nedica | 2004.02.01 | 16124 |
| 1557 |
가장~~!! 쉽게 얼음글씨 맹글기
[8]
| 위스노우 | 2004.01.31 | 10494 |
| 1556 |
우주만들기
[10]
| NzeoZen | 2004.01.31 | 9506 |
삭제되오니 이점 유의하시고 이미지박스를 이용해서 강좌를 수정해주시길 부탁드립니다.
(용량 올려드렸습니다.)
물고기가 귀엽네요^^