웹디자인 강의
Photoshop (왕초보도 따라하는) 심플한 버튼 만들기
2004.02.27 18:20
예전에 웹서핑 하다가 어느 사이트에서 비슷한 모양의 버튼을 봤는데,
너무 심플하고 예쁘드라구요. 쉽게 만들어지는 버튼이라
초보분들도 다(?) 따라할 수 있도록 하다보니 양이 많아졌습니다.
이 강좌는 네이버카페(포토샵완전정복)에도 있는 강좌이며, 이곳에도 올려져 있음을
밝혀(?)드립니다.
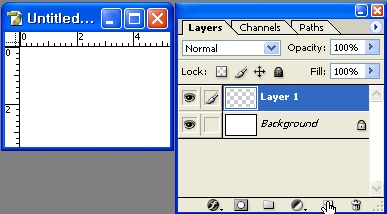
1. [File]-[New]를 하여 새창을 하나 열어주세요. width: 200pixel Height: 100pixel
그리고 레이어 팔레트에서 새레이어를 하나 추가해주세요.
2. 툴박스에서 사각선택툴을 선택하신 후, 사각박스를 하나 그려주세요.
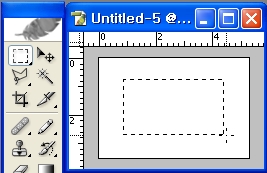
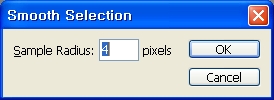
3. [Select]-[Modify]-[Smooth]로 들어가서 Sample Radius의 수치를 4pixel정도 넣어주세요.
그럼 직사각형의 사각형의 끝부분이 둥그스름해 집니다.
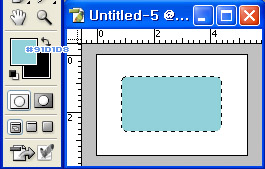
4. 전경색을 #91D1D8로 선택하신 후, Alt+Delete키를 눌러 선택한 색상으로 채워줍니다.
5. 선택영역이 살아있는 상태에서 레이어를 하나 더 추가해주세요.

6. [Select]-[Modify]-[Expand]로 들어가서 2pixel정도로 선택한 후, OK를 해주세요.
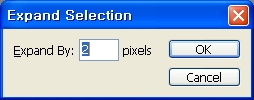
7. 그럼 아래 그림처럼 선택영역이 좀 더 커진답니다.

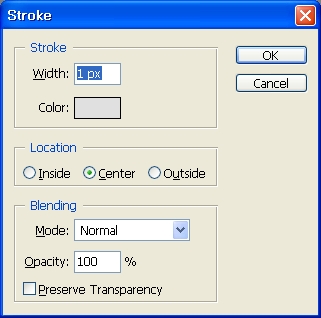
8. [Edit]-[Stroke]로 들어가서 Width는 1px, 컬러는 연한 회색을 선택해주시고, OK해주세요.
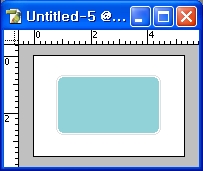
9. Ctrl+D를 눌러 선택영역을 해제하여 주면, 아래 그림과 같이 나옵니다.
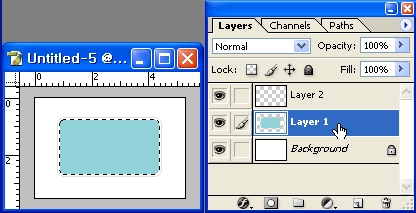
10. Ctrl키를 누른채 Layer 1 레이어를 클릭해주시면 색상이 들어간 부분만 선택영역으로
깜빡깜빡 거립니다.
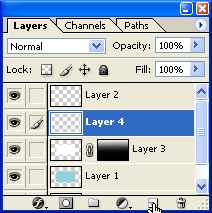
11. Layer 1레이어 바로 위쪽에 새로운 레이어를 하나 추가해주세요. 그럼 Layer 3번 레이어가
생긴답니다.
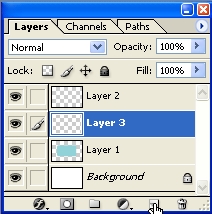
12. [Select]-[Modify]-[Contract]로 들어가서, Contract by의 수치를 2pixel정도 주세요.

13. 배경색이 흰색으로 선택된 상태에서 Ctrl+Delete키를 누르면 흰색으로 채워집니다.

14. 흰색을 채운 레이어가 선택된 상태에서 레이어팔레트 하단에 레이어마스크 버튼을
클릭해주세요.
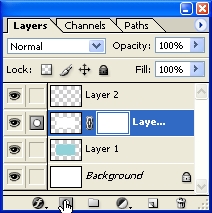
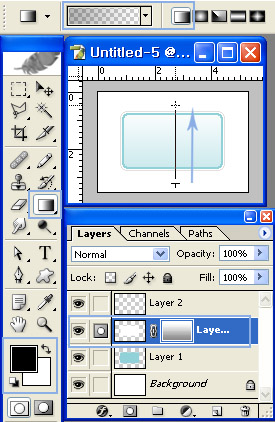
15. 레이어 마스크를 클릭해주면, 자동으로 툴박스의 색상모드가 아래와 같이 바뀝니다.
그라데이션툴을 선택하시고, 옵션바도 아래 그림처럼 선택하신 후, 작업창으로 가세요.
화살표를 해 놓았듯이, 아래쪽에서 위쪽으로 마우스를 끌어올려주세요.
그럼 아래쪽의 흰부분이 자연스럽게 연해집니다.
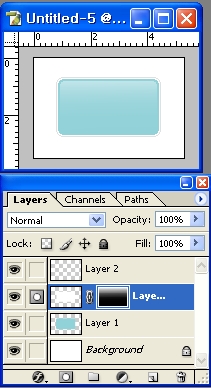
16. 15번과 같은 작업(마우스를 아래에서 위로 드래그해주는 작업)을 여러번 해주세요.(4~5번)
그럼 아래와 같이 더 자연스러워 집니다.
17. 새 레이어를 하나 더 추가해주세요.
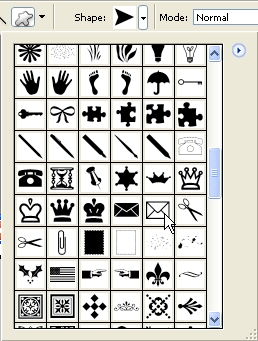
18. 툴박스에서 Custom Shape Tool을 선택하신 후, 원하는 모양의 아이콘을 선택해주세요.
저는 편지지모양을 선택했습니다.
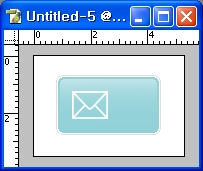
19. 전경색이 흰색으로 선택된 상태에서 작업창에 알맞은 위치에 편지지 모양을 넣어주세요.
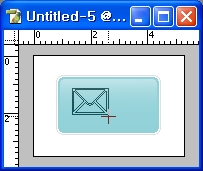
20. 그럼 아래와 같이 나오지요?
21. 타입툴을 선택하고, 원하는 글씨를 넣어주세요.
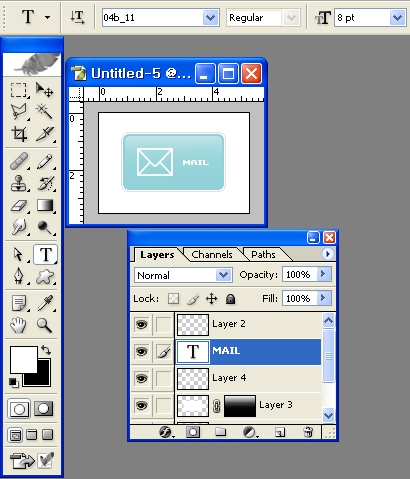
22. 완성본입니다.

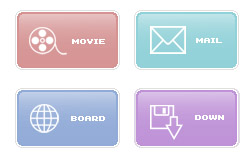
23. 맘에드는 색상으로 여러개의 아이콘을 만들어보세요.
너무 심플하고 예쁘드라구요. 쉽게 만들어지는 버튼이라
초보분들도 다(?) 따라할 수 있도록 하다보니 양이 많아졌습니다.
이 강좌는 네이버카페(포토샵완전정복)에도 있는 강좌이며, 이곳에도 올려져 있음을
밝혀(?)드립니다.
1. [File]-[New]를 하여 새창을 하나 열어주세요. width: 200pixel Height: 100pixel
그리고 레이어 팔레트에서 새레이어를 하나 추가해주세요.
2. 툴박스에서 사각선택툴을 선택하신 후, 사각박스를 하나 그려주세요.
3. [Select]-[Modify]-[Smooth]로 들어가서 Sample Radius의 수치를 4pixel정도 넣어주세요.
그럼 직사각형의 사각형의 끝부분이 둥그스름해 집니다.
4. 전경색을 #91D1D8로 선택하신 후, Alt+Delete키를 눌러 선택한 색상으로 채워줍니다.
5. 선택영역이 살아있는 상태에서 레이어를 하나 더 추가해주세요.
6. [Select]-[Modify]-[Expand]로 들어가서 2pixel정도로 선택한 후, OK를 해주세요.
7. 그럼 아래 그림처럼 선택영역이 좀 더 커진답니다.
8. [Edit]-[Stroke]로 들어가서 Width는 1px, 컬러는 연한 회색을 선택해주시고, OK해주세요.
9. Ctrl+D를 눌러 선택영역을 해제하여 주면, 아래 그림과 같이 나옵니다.
10. Ctrl키를 누른채 Layer 1 레이어를 클릭해주시면 색상이 들어간 부분만 선택영역으로
깜빡깜빡 거립니다.
11. Layer 1레이어 바로 위쪽에 새로운 레이어를 하나 추가해주세요. 그럼 Layer 3번 레이어가
생긴답니다.
12. [Select]-[Modify]-[Contract]로 들어가서, Contract by의 수치를 2pixel정도 주세요.
13. 배경색이 흰색으로 선택된 상태에서 Ctrl+Delete키를 누르면 흰색으로 채워집니다.
14. 흰색을 채운 레이어가 선택된 상태에서 레이어팔레트 하단에 레이어마스크 버튼을
클릭해주세요.
15. 레이어 마스크를 클릭해주면, 자동으로 툴박스의 색상모드가 아래와 같이 바뀝니다.
그라데이션툴을 선택하시고, 옵션바도 아래 그림처럼 선택하신 후, 작업창으로 가세요.
화살표를 해 놓았듯이, 아래쪽에서 위쪽으로 마우스를 끌어올려주세요.
그럼 아래쪽의 흰부분이 자연스럽게 연해집니다.
16. 15번과 같은 작업(마우스를 아래에서 위로 드래그해주는 작업)을 여러번 해주세요.(4~5번)
그럼 아래와 같이 더 자연스러워 집니다.
17. 새 레이어를 하나 더 추가해주세요.
18. 툴박스에서 Custom Shape Tool을 선택하신 후, 원하는 모양의 아이콘을 선택해주세요.
저는 편지지모양을 선택했습니다.
19. 전경색이 흰색으로 선택된 상태에서 작업창에 알맞은 위치에 편지지 모양을 넣어주세요.
20. 그럼 아래와 같이 나오지요?
21. 타입툴을 선택하고, 원하는 글씨를 넣어주세요.
22. 완성본입니다.
23. 맘에드는 색상으로 여러개의 아이콘을 만들어보세요.
댓글 53
-
장철희
2005.10.04 16:29
뭣진 강좌입니다. 감사합니다 -
김현진
2005.10.11 15:26
대단한 강좌입니다 존경해여;; -
thesquare
2006.07.01 23:57
최곱니다. 욕나올정도로 이쁩니다.
그대 존경합니다