웹디자인 강의
Photoshop Gradient Map으로 화창한 하늘을~
2003.12.15 23:12
※참고 : 이 강좌는 WalkCabbage님의 강좌를 응용했습니다.
http://www.nzeo.com/bbs/zboard.php?id=p_design&page=1&sn1=&divpage=1&sn=off&ss=on&sc=off&select_arrange=headnum&desc=asc&no=2517


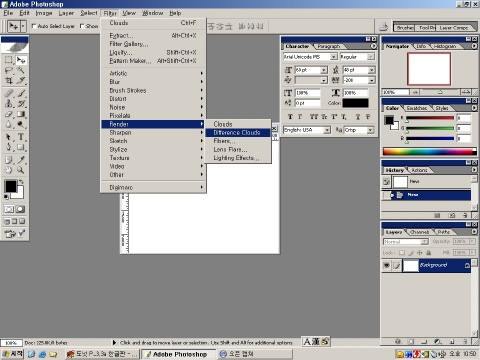
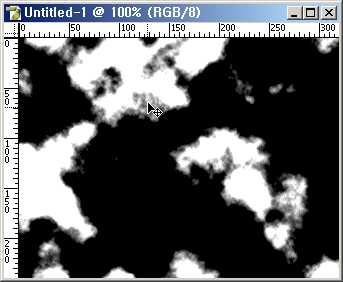
Ctrl + F 를 눌러 Different Cloud 필터를 한번 더 적용해줍니다.
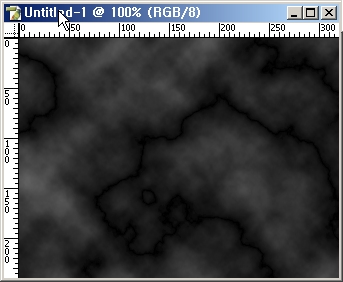
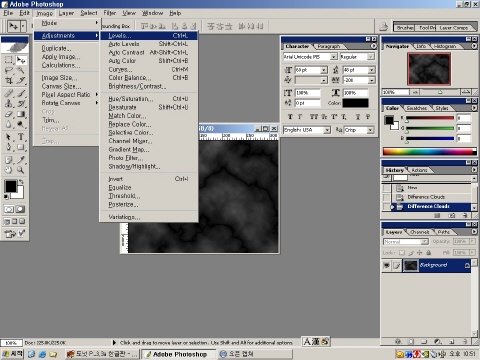
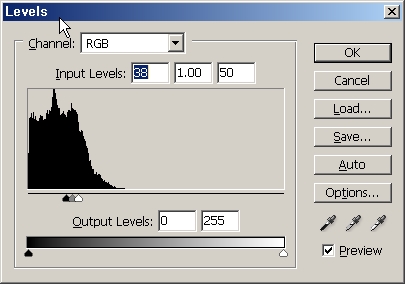
Level 보정으로 구름의 윤곽이 어느 정도 드러나게 적당한 수치를 잡아줍니다.
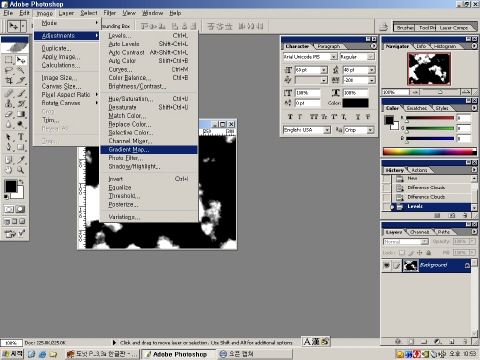

Gradient Map 메뉴를 선택한 후, 시작을 푸른 색, 끝을 하얀 계열로 정하고 적용합니다.
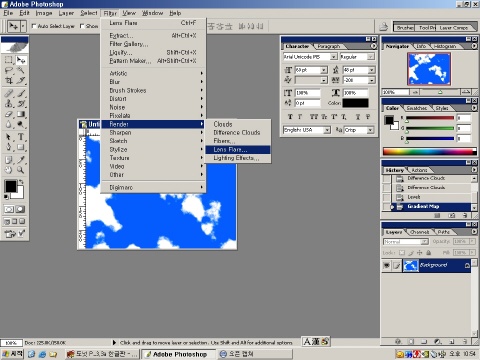
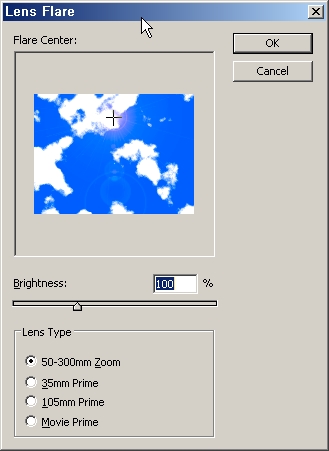
Lens Flare 필터를 선택하고 적당한 렌즈 타입(태양광과 비슷한,)을 선택한 후, 구름과 하늘의 경계 부분에 적용합니다.
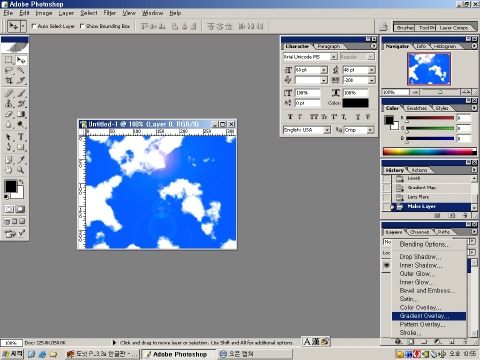
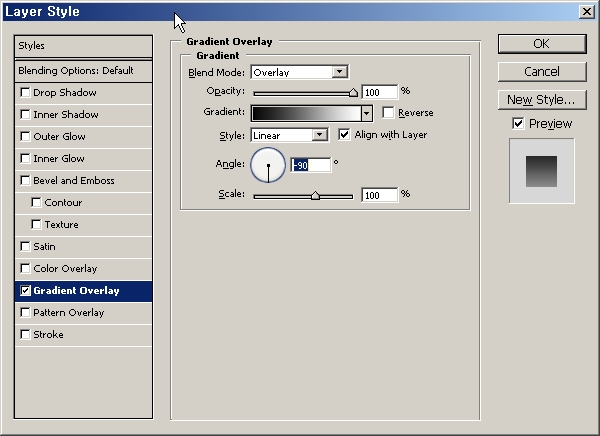
레이어 스타일에서 Gradient Overlay를 선택한 후, 아래쪽이 밝아지도록 설정하고 적용합니다.
Blend Mode는 Overlay,Screen,Soft Light가 적당합니다.

Gradient Map 의 기능은 어두운 곳을 그라디언트의 시작으로, 밝은 곳을 그라디언트의 끝으로 하는 기능입니다.
※참고 : 이 강좌는 WalkCabbage님의 강좌를 응용했습니다.
http://www.nzeo.com/bbs/zboard.php?id=p_design&page=1&sn1=&divpage=1&sn=off&ss=on&sc=off&select_arrange=headnum&desc=asc&no=2517
http://www.nzeo.com/bbs/zboard.php?id=p_design&page=1&sn1=&divpage=1&sn=off&ss=on&sc=off&select_arrange=headnum&desc=asc&no=2517
Ctrl + F 를 눌러 Different Cloud 필터를 한번 더 적용해줍니다.
Level 보정으로 구름의 윤곽이 어느 정도 드러나게 적당한 수치를 잡아줍니다.
Gradient Map 메뉴를 선택한 후, 시작을 푸른 색, 끝을 하얀 계열로 정하고 적용합니다.
Lens Flare 필터를 선택하고 적당한 렌즈 타입(태양광과 비슷한,)을 선택한 후, 구름과 하늘의 경계 부분에 적용합니다.
레이어 스타일에서 Gradient Overlay를 선택한 후, 아래쪽이 밝아지도록 설정하고 적용합니다.
Blend Mode는 Overlay,Screen,Soft Light가 적당합니다.
Gradient Map 의 기능은 어두운 곳을 그라디언트의 시작으로, 밝은 곳을 그라디언트의 끝으로 하는 기능입니다.
※참고 : 이 강좌는 WalkCabbage님의 강좌를 응용했습니다.
http://www.nzeo.com/bbs/zboard.php?id=p_design&page=1&sn1=&divpage=1&sn=off&ss=on&sc=off&select_arrange=headnum&desc=asc&no=2517
댓글 10
| 번호 | 제목 | 글쓴이 | 날짜 | 조회 수 |
|---|---|---|---|---|
| 공지 | 공지 강좌를 올리기전 공지사항을 읽어주세요 [12] | Eccen | 2004.12.15 | 48031 |
| 955 | [제로보드강좌]9강. 회원관리/외부로그인 [45] | 네찌 | 2007.01.04 | 10455 |
| 954 |
뽀샤시한 화이트닝 보정효과
[2]
| 포샵럽 | 2005.07.30 | 10459 |
| 953 |
종이 질감 내기..랄까요?
[11]
| YuːI | 2003.02.13 | 10463 |
| 952 |
교수-학습 자료 제작및 활용 강의교재
| 김종판 | 2007.11.13 | 10483 |
| 951 |
No3. 쿠션그리기
[8]
| Wings | 2002.03.28 | 10486 |
| 950 |
회전 계단 그리기
[3]
| rene | 2005.01.02 | 10488 |
| 949 | 이미지 집중효과 29강 [1] | 문학의향기 | 2006.07.31 | 10505 |
| 948 |
이미지 접힌 효과 내기
[27]
| 이태운 | 2003.02.17 | 10518 |
| 947 |
[여니강좌]돌맹이 느낌 문자
[19]
| 눈나라 | 2003.06.24 | 10538 |
| 946 |
도트 패턴
[2]
| 김혜영 | 2005.05.28 | 10541 |
| 945 | 이미지에 타일효과주기 [11] | 써니~ | 2002.04.07 | 10544 |
| 944 |
하늘에 떠있는 구름 만들기..
[1]
| 가을쿠키 | 2006.08.30 | 10552 |
| 943 |
디테일 스케치
[6]
| 웹디황용 | 2006.03.07 | 10569 |
| 942 |
특별한 스타버스트효과.
[28]
| Nersion | 2003.02.17 | 10570 |
| 941 |
뽀토샵 기초 TIP
[6]
| 루끼 | 2006.09.11 | 10574 |
| 940 |
[MN] 포토샵에 자주쓰는 필터 효과 주기
[8]
| mewnew | 2003.12.25 | 10577 |
| 939 |
칼로 자른듯한 그림자 텍스트
[1]
| 여어자 | 2003.05.06 | 10600 |
| 938 |
No1. 곰돌이그리기
[7]
| Wings | 2002.03.24 | 10601 |
| 937 |
[Swishmax] 라벨을 이용하여 메뉴 만들기
[7]
| 세나맘 | 2004.03.09 | 10616 |
| 936 |
동화같은 가을 숲(밥로스)
[20]
| scaci | 2008.01.19 | 10626 |