웹마스터 팁
왼쪽메뉴줄이고 오른쪽에 박스만들어 내용쉽게넣기
2008.02.07 02:06
다른 초보분에게 조금이나마 도움이될까하고 올립니다.
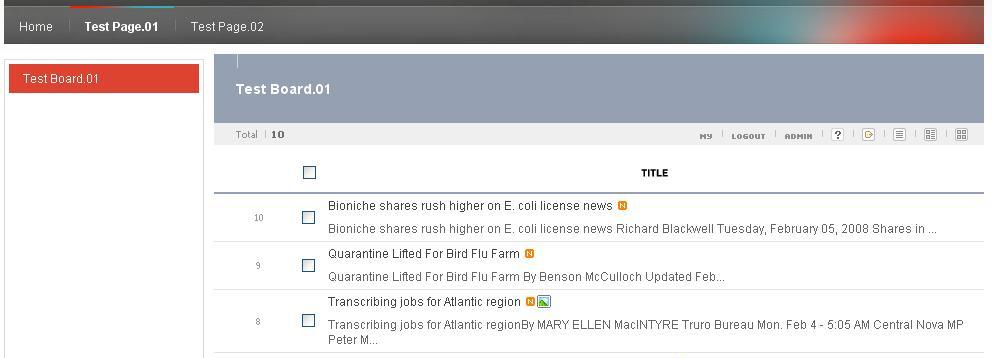
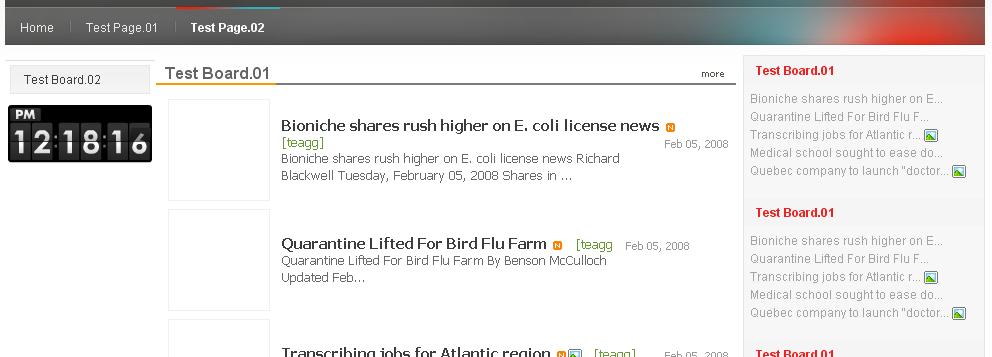
이런 모습을 아래처럼 만드는 팁입니다.
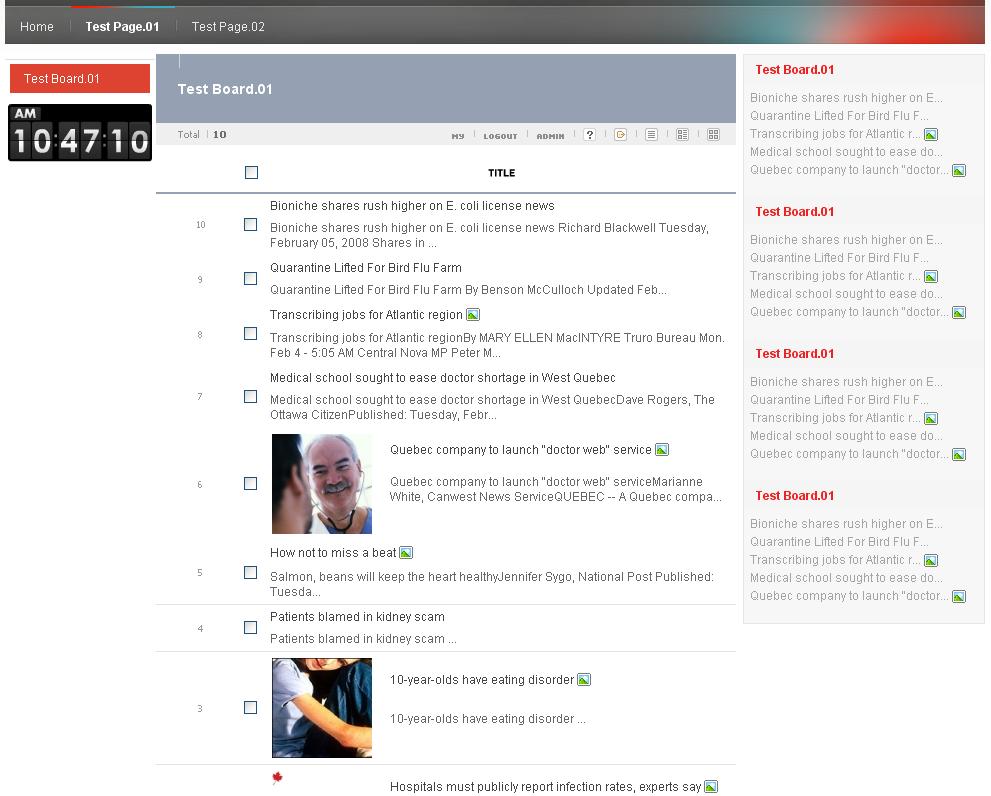
이팁은 보드옆에 또 다른 내용이나 광고를 넣을수 있는 장점이 있읍니다. 물론 페이지모드에서두 마찬가지입니다.
하지만 왼쪽메뉴가 작아지기때문에 로그인창을 없애주던가 위에부분으로 옮겨야합니다.
여러 레이아웃으로 해결가능합니다.
기본 레이아웃에 default.css을 기초로 작업하였읍니다.
예는 왼쪽은 50px를 줄이고 오른쪽은 240px 크기의 박스입니다.
적당히 자기사이트에 맞추세요.
우선 layouts/xe_official/css 에서 작업할 css를 불러옵니다.
/* Site Layout - Column Left */
#columnLeft { position:relative; width:201px; float:left;}
#columnLeft .mask { width:201px; height:5px; background:#ffffff; display:block; clear:both;}

#lnb { border-top:1px solid #dddddd; padding:4px 5px; width:190px;}
#lnb li { padding-bottom:4px; list-style:none; }
#lnb li a { padding:6px 5px 6px 13px; width:170px; display:block; border:1px solid #e8e8e8; ba
/* Site Layout - Column Left */
#columnLeft { position:relative; width:151px; float:left;}
#columnLeft .mask { width:151px; height:5px; background:#ffffff; display:block; clear:both;}
#lnb { border-top:1px solid #dddddd; padding:4px 5px; width:140px;}
#lnb li { padding-bottom:4px; list-style:none; }
#lnb li a { padding:6px 5px 6px 6px; width:120px; display:block; border:1px solid #e8e8e8; ba
이렇게 고쳐줍니다. 근데 아래처럼 완벽하지가 않네요.
이럴땐 53쪽과 76쪽을 고쳐주면됩니다.
/* Site Layout - Content Body */
#contentBody { position:relative; width:980px; padding-bottom:30px; overflow:hidden; background:url(../images/default/bgContentBody.gif) repeat-y left top; border-bottom:1px solid #dddddd;}
----------------------------------------------------------------------------------------------------
/* Site Layout - Column Right */
#columnRight { width:770px; float:right; overflow:hidden;}
#visualArea { width:770px; height:200px; background:#f5f5f5; margin-bottom:2.5em; position:relative; left:-15px; margin-right:-15px;}
#content { width:100%; overflow:hidden;}
아래처럼 고치면됩니다. 아니면 bgContentBody.gif 를 적당히 줄이면 됩니다.
/* Site Layout - Content Body */
#contentBody { position:relative; width:980px; padding-bottom:30px; overflow:hidden; border-bottom:1px solid #dddddd;}
----------------------------------------------------------------------------------------------------
 /* Site Layout - Column Right */
#columnRight { width:820px; float:left; overflow:hidden;}
#visualArea { width:820px; height:200px; background:#f5f5f5; margin-bottom:2.5em; position:relative; left:-15px; margin-right:-15px;}
#content { width:100%; overflow:hidden;}
이렇게 바뀐것을 확인할수 있을 겁니다.
이제 오른쪽에 내용을 넣을수 있는 박스를 만들겠읍니다.
/* Site Layout - Column Right */
#columnRight { width:820px; float:left; overflow:hidden;}
#visualArea { width:820px; height:200px; background:#f5f5f5; margin-bottom:2.5em; position:relative; left:-15px; margin-right:-15px;}
#content { width:100%; overflow:hidden;}
76쪽을 아래와같이 바꿔줍니다. 그리고 #mainright로 시작되는 문구를 아래처럼 넣어줍니다.
/* Site Layout - Column Right */
#columnRight { width:580px; float:left; overflow:hidden;}
#visualArea { width:580px; height:200px; background:#f5f5f5; margin-bottom:2.5em; position:relative; left:-15px; margin-right:-15px;}
#content { width:100%; overflow:hidden;}
#mainright { position:relative; float:right; margin-top:0px; width:240px; background:#f7f7f7; border:1px solid #e7e7e7;}
이제는 레이아웃을 손볼차려입니다.
레이아웃 아래쪽을 보면
<!-- 컨텐츠 시작 -->
{$content}
이라는 문구밑에 아래처럼 해줍니다
<!-- 컨텐츠 시작 -->
{$content}
</DIV>
<DIV id="mainright">
</DIV>
위젯으로 새로운 글이나 코멘트, 광고 등등을 만드신후
<DIV id="mainright"> 바로 아래 넣으면 됩니다.
<!-- 컨텐츠 시작 -->
{$content}
</DIV>
<DIV id="mainright">
<img width="100%" height="100" src="http://test.com/test/tg/common/tpl/images/widget_bg.jpg" class="zbxe_widget_output" style="clear:both;" widget="newest_document" body="" skin="cozy_simple" colorset="red" widget_cache="0" title="Test Board.01" order_target="list_order" order_type="desc" list_count="" duration_new="" subject_cut_size="32" mid_list="b10001" widget_sequence="130" />
</DIV>
이런식으로 말이죠. 그럼 아래처럼 작업이 끝나게 됩니다.
저는 레이아웃을 여러개 만들어서 각각의 페이지나 보드에 적용해 쓰고 있읍니다.
잘 쓰시고 여러 좋은 팁이 나왔으면 좋겠읍니다.
--------------------------------------------
제가 지금 두군데 각기 다른 호스팅 회사를 쓰고 있는데 한쪽은 0.2.9도 문제없이 잘 되는데
한쪽은 0.2.9는 안깔리고 0.2.8만 깔립니다... 거의 같은 환경인데.. 근데 안깔리는데는
php version이 5.2.5 더군요.. 그래서 안깔리나? 누구 아시는분?ㅎㅎ
----------------------------------------------------------------------------------
팁 잘쓰고 웬 질문?ㅋㅋ
전 이만..
댓글 15
-
땡큐
2008.02.07 20:52
ㅜ.ㅜ 고맙습니다... 너무 고마워서 눈물이 나려고 해요... 복 마~~~니 받으세요~ -
감사
2008.02.07 23:56
저도 이것땜시 몇시간을 헤메고 있었어요 감사합니다.
-
Capyou
2008.02.08 10:56
"저는 레이아웃을 여러개 만들어서 각각의 페이지나 보드에 적용해 쓰고 있읍니다."
이상하네요. 여러개의 레아아웃 생성은 용량면.트래픽면에서 안좋습니다 .저라면
한개의 레이아웃에 IF(조건) 으로 구분해서 쓰는게 좋을듯.. -
plruto
2008.02.08 19:24
무슨말씀이신지.. 스킨용량은 250kb밖에는 안되고 트래픽두 차이 없던데..
(한개의 레이아웃에 IF(조건) 으로 구분해서 쓰는게 좋을듯) 전 이 말이 무슨말인지 모르겠네요.
잘 아신다면 자세하게라도 쓰시지... -
Capyou
2008.02.08 21:56
예를 들면 MID값별로 오른쪽 div 스타일을 어떻게할것인지
<!--@if(mid == "test")-->만약 mid값이 "test"라면
<!--%import("css/style1.css")--> //css폴더의 style1.css를 임포트하고
<!--@else if(mid == "test2")--> // mid값이 다르게 test2라면
<!--%import("css/style2.css")-->// css폴더의 style2.css를 임포트하고
<!--@else--> //일반적인 경우
<!--%import("css/style.css")--> css폴더의 style.css를 정의한다
<!--end-->
이런식으로 가능합니다 -
plruto
2008.02.09 19:08
제가 모르겠다는것은 레이아웃과 css의 연동이 아니라 오른쪽박스안에 생성해둔 위젯이나 광고를 각기 다른 페이지나 보드안에 각기 다른 위젯이나 광고로 어떻게 바꿀수 있는지를 물어보는겁니다.
Test1 에는 최근글을, Test2 에는 광고만 이런식으로 말입니다. -
제주사랑
2008.02.10 02:45
레이아웃 여러개 만들지말고 서브 페이지를 여러개 만들어 사용해도 될것같은데요.
메뉴별로 서브 페이지 (mid) 만들어서 적용
예를 들면 test1 . test2 test3 메뉴 라면 test1 . test2 . test3 메뉴 에
test1. test2 .test3 서브 페이지 만들어 각각 적용하고
div 밑에 테이블로 넣어도 되고. 아니면 테이블 없이 div 로만 하든지...
plruto 님이 원하는 방법 같습니다.
test1 서브페이지.
<!-- 컨텐츠 시작 -->
{$content}
</DIV>
<DIV id="mainright">
최근글1
<img width="100%" height="100" src="http://test.com/test/tg/common/tpl/images/widget_bg.jpg" class="zbxe_widget_output" style="clear:both;" widget="newest_document" body="" skin="cozy_simple" colorset="red" widget_cache="0" title="Test Board.01" order_target="list_order" order_type="desc" list_count="" duration_new="" subject_cut_size="32" mid_list="b10001" widget_sequence="130" />
.................. (광고).............. .................. (베너).............
최근글2
<img width="100%" height="100" src="http://test.com/test/tg/common/tpl/images/widget_bg.jpg" class="zbxe_widget_output" style="clear:both;" widget="newest_document" body="" skin="cozy_simple" colorset="red" widget_cache="0" title="Test Board.01" order_target="list_order" order_type="desc" list_count="" duration_new="" subject_cut_size="32" mid_list="b10001" widget_sequence="130" />
test2 서브페이지.
<!-- 컨텐츠 시작 -->
{$content}
</DIV>
<DIV id="mainright">
................. (베너)................ ................. (광고)................ .................. (베너)..............
최근글1
<img width="100%" height="100" src="http://test.com/test/tg/common/tpl/images/widget_bg.jpg" class="zbxe_widget_output" style="clear:both;" widget="newest_document" body="" skin="cozy_simple" colorset="red" widget_cache="0" title="Test Board.01" order_target="list_order" order_type="desc" list_count="" duration_new="" subject_cut_size="32" mid_list="b10001" widget_sequence="130" />
최근글.2
<img width="100%" height="100" src="http://test.com/test/tg/common/tpl/images/widget_bg.jpg" class="zbxe_widget_output" style="clear:both;" widget="newest_document" body="" skin="cozy_simple" colorset="red" widget_cache="0" title="Test Board.01" order_target="list_order" order_type="desc" list_count="" duration_new="" subject_cut_size="32" mid_list="b10001" widget_sequence="130" />
test 3 서브페이지
.................. 광고 ............ ...................베너 .............. ..................광고 ............. ..................광고 .......... -
plruto
2008.02.10 07:31
오오~~
되는지 한번 해봐야겠네요.
고맙습니다. -
제주사랑
2008.02.10 08:22
저도 님에게 감사드립니다...
어설프게 알고있던 우측 활용 방법을 님 덕분에 확실하게 배웠습니다.
몇가지 모르는거 더 배우려고 하는데 님 홈페이지 주소가 없네요...gif)
-
블루파티
2008.08.27 02:21
레이아웃을 여러개 만들지 말고 서브페이지를 여러개 만들라는 말씀을 좀 더 상세히 적어주시면 감사하겠습니다. 결국 각 서브페이지에 넣으라고 적으신 코드들은 layout.html에 넣어야 하는 것이므로, 결과적으로 레이아웃을 여러개 만들지 않고서는 도저히 안되는 게 아닌지요? -
준이사랑
2008.02.20 21:29
정말 고맙습니다 온갖 방법을 써도 못했는데 덕분에 좋은 팁 얻어갑니다
-
자꾸땀흘러
2008.03.14 18:01
위 방법으로 수정했을 경우 3차 메뉴의 화살표가 컬럼을 넘어가서 표시가 됩니다.
이 부분은 어떻게 처리 해야 할까요? -
석이-
2008.05.29 00:43
감사합니다.. 정말 몰라서 헤매고 있었는데 .. ^^ -
wsh
2009.04.28 21:42
정말 고맙습니다! 엄청 찾고 있던건데 ㅠ 감사합니다. 저도 나중에 초보자들을 위해 팁도 올리고 해야겠어요. 수고하셨습니다.
-
hanskil
2009.10.13 01:54
감사요.. 다른스킨에 적용시 많은 은용이 필요하네요.. 3시간만에 다른스킨에도 적용하였습니다..
#lnb li a { padding:6px 5px 6px 6px; width:120px; display:block; border:1px solid #e8e8e8; ba 이부분 스킨마다 다르니 padding 부분 숫자 잘적용해보세요 겹처보이고 그런건 다이부분때문이더라고요..
imges/default 부분에서 이미지 수정후 padding 설정마추시면 그닥어려움 없이 하실듯합니다.
| 제목 | 글쓴이 | 날짜 |
|---|---|---|
| 제로보드 XE가 갑자기 느려져서 확인해봤더니 [1] | jy1664 | 2009.10.27 |
| [수정] 최근 이미지 추출에 new 이미지 등이 나타나게 하기... [5] | 비나무 | 2007.12.09 |
| UCC솔루션에 대한 조사입니다~^^ [2] | 내다 | 2009.01.08 |
| 하나의 게시물을 각각 다르게 보이도록 만드는 방법 [5] | 얼터1.0 | 2009.10.24 |
| 호스팅 하시는 분들 서버사용량 줄이세요.. [8] | ☆쫑 | 2008.09.19 |
|
제로보드XE 외부출석부
[1]
| noirzo | 2009.01.18 |
| [초보] 본문 하단에 구글 애드센스 삽입방법 [2] | BigSeong | 2009.10.10 |
|
오늘 게시된 글은 날짜 대신 today 그림으로 대치 (왕초보용 초간단팁)
| jsuimage | 2009.10.21 |
| 방명록 스킨을 통한 글 작성시 임시저장 가능케 하기(수정) | 라르게덴 | 2008.07.08 |
| 1.0.3 버전 이상부터 본문 내 이미지 자동 리사이징이 안되는 경우 [1] | kirrie | 2008.08.01 |
|
가입시 웹마스터에게 가입했다는 메일 보내기.
[4]
| dhseo | 2008.06.02 |
|
DB 이전시 오류 해결,,,하하하하...끝네 해결 했음....
| Crazyhouse.cn | 2009.10.16 |
| 레이아웃에서 배경이미지를 좌-아래에 넣을 경우 | 오스카 | 2009.10.10 |
| www가 붙는 도메인과 그렇지 않은 도메인 하나로 처리하기 [8] | 똑디 | 2008.01.18 |
|
첨부 파일 용량 문제 - 이것도 저것도 않될때
[4]
| DeJavu346 | 2009.01.22 |
| 인터넷 익스플로러 vs 파이어 폭스 속도 차이 [3] | Jiwoon Kim | 2009.01.25 |
| 레이아웃에 위젯 넣을때 위젯 사이즈 조절 [4] | mojo9 | 2008.11.07 |
|
왼쪽메뉴줄이고 오른쪽에 박스만들어 내용쉽게넣기
[15]
| plruto | 2008.02.07 |
| 최근게시물의 캐시파일을 일반문서에 불러들이기 [2] | 고진감래 | 2009.10.09 |
|
제로보드의 아이콘을 내 맘대로 변경하기...(1)
[3]
| winter548 | 2009.03.23 |