03. 그래프(pchart) 에디터 컴포넌트 템플릿 popup.html 만들기
조회 수 747 추천 수 0 2009.08.20 12:28:54
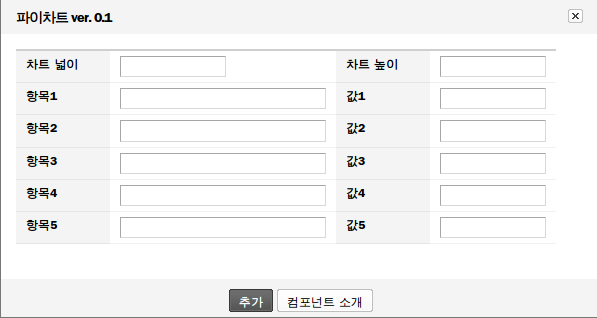
* 파이차트 입력 팝업창
pchart의 넓이(#chart_width)와 높이(#chart_height)를 입력 받고, 파이 그래프 항목의 타이틀(#title0 ~ #title4)과 값(#title0 ~ #title5)을 입력 받도록 합니다. 그리고 실제 에디터에 추가 되는 부분(위 그림에서 "추가" 버튼)은 insertPChart() javscript 함수를 호출하도록 하였습니다.
<!--%import("popup.js")-->
<!--%import("popup.css")-->
<div id="popHeader">
<h3 class="xeAdmin">{$component_info->title} ver. {$component_info->version}</h3>
</div>
<form action="./" onSubmit="return false">
<input type="hidden" id="api_url" value="{$api_url}" />
<div id="popBody">
<table cellspacing="0" class="rowTable">
<col width="100" />
<col />
<col width="100" />
<col />
<tr>
<th scope="row"><div>차트 넓이</div></th>
<td><input type="text" id="chart_width" value="" class="inputTypeText w100" /></td>
<th scope="row"><div>차트 높이</div></th>
<td><input type="text" id="chart_height" value="" class="inputTypeText w100" /></td>
</tr>
<!--@for($i=0;$i<5;$i++)-->
<tr>
<th scope="row"><div>항목{$i+1}</div></th>
<td><input type="text" id="title{$i}" value="" class="inputTypeText w200" /></td>
<th scope="row"><div>값{$i+1}</div></th>
<td><input type="text" id="value{$i}" value="" class="inputTypeText w100" /></td>
</tr>
<!--@end-->
</table>
</div>
<div id="popFooter" class="tCenter">
<a href="#" onclick="insertPChart()" class="button black strong"><span>{$lang->cmd_insert}</span></a>
<a href="#" onclick="winopen('./?module=editor&act=dispEditorComponentInfo&component_name={$component_info->component_name}','ComponentInfo','left=10,top=10,width=10,height=10,resizable=no,scrollbars=no,toolbars=no');return false;" class="button"><span>{$lang->about_component}</span></a>
</div>
</form>