웹디자인 강의
Photoshop 3D SHEET 만들기
2002.02.21 20:45
3D SHEET 만들기 입니다. 저처럼 가로로 넓은 이미지도 좋겠지만, 새로로 길다란 이미지는 더욱 보기 좋습니다^^
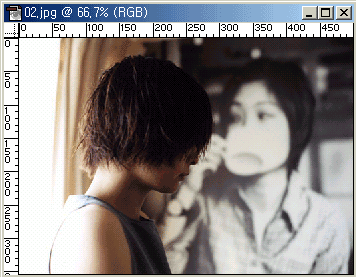
1 . 이미지를 하나 불러 옵니다.
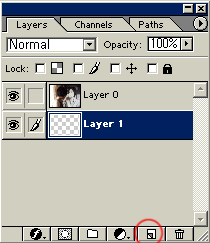
2 . 이미지를 레이어로 만들고 ( 레이어 더블클릭 ) , 새로운 레이어를 만든후 이미지 레이어 밑에 둡니다.
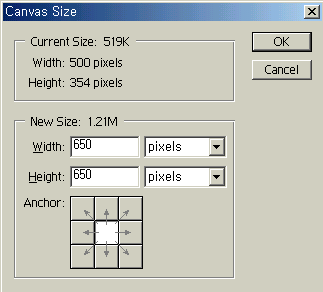
3 . Image > Canvas Size해서 적당히 캔버스크기를 늘려 줍니다. ( 넓으면 좋겠죠? )
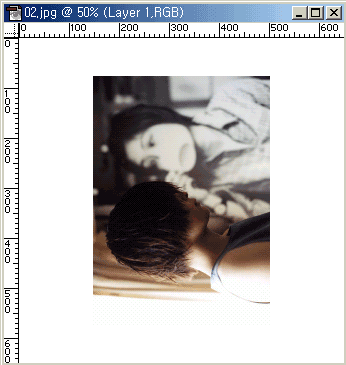
4 . Image > Rotte Canvas > 90 CCW해주고, 2번에서 새로만든 레이어를 흰색으로 채워줍니다.
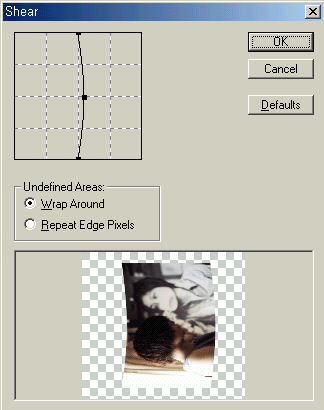
5 . Filter > Distort > Shear해서 위처럼 해줍니다.
컴터가 다운됐다가 다시 했더니 투명부분으로 남아 있군요 : )
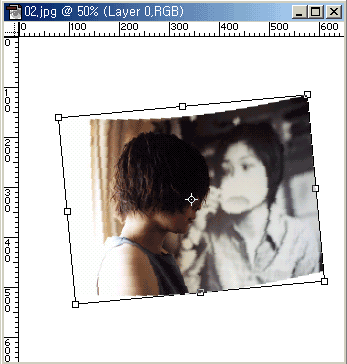
6 . Edit > Transform > Rotate해서 적당히 돌려봅니다.
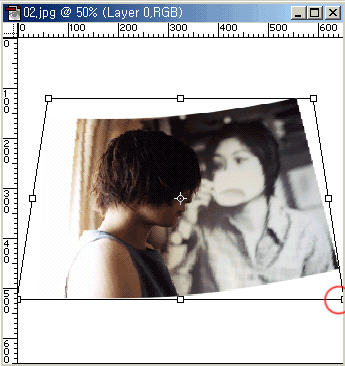
7 . Edit > Transform > Perspective해서 오른쪽 빨간원이 있는 부분을 밑으로 드래그 해줍니다.
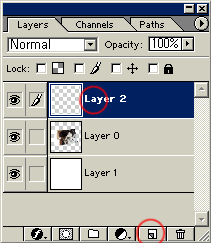
8 . 새로운 레이어를 만들고 제일 위로 올립니다.

9 . 전경색을 밝은회색으로 배경색을 검정색으로 지정해 줍니다.

10 . 그라디언트툴을 선택합니다. ( Linear Gradient, Foreground to Background )
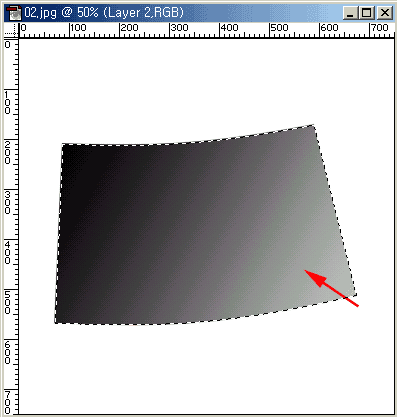
11 . 새로만든 레이어에 화살표 방향으로 드래그 해줍니다.
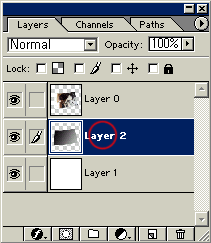
12 . 레이어 위치를 이미지 밑으로 내려줍니다.
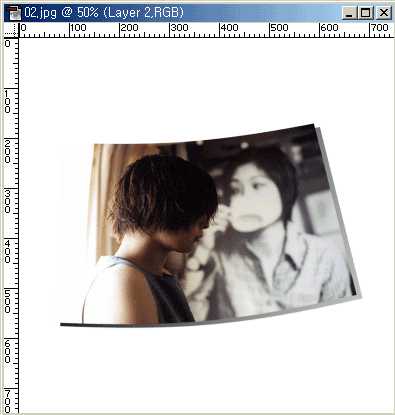
13 . 무브툴 ( V ) 을 이용해 밑으로 내립니다. 이제 좀 뭐 같군요...
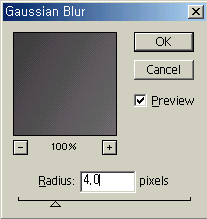
14 . 그림자를 좀더 부드럽게 하기위해 Filter > Blur > Gaussian Blur 를 적용합니다.
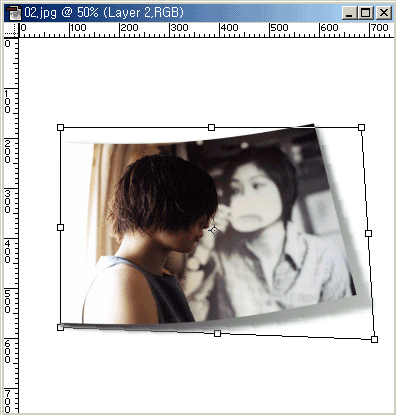
15 . Edit > Transform > Distort해서 오른쪽 밑을 약간 내려줍니다. ( 이미지 참고 )
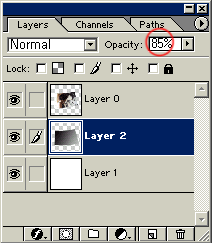
16 . 레이어의 투명도를 85%로 줍니다. ( 불투명도-_-;; )
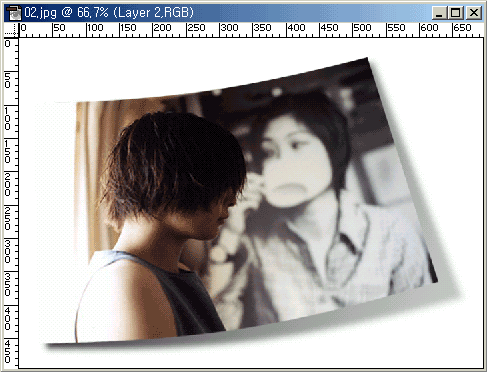
17 . 완성품입니다...저는 상당히 맘에 드네요 ^___^
.................................................................................................
윗 강좌의 원천지 입니다. 하도 오래되서 어딘지는 정확히 모르겠습니다.
http://psworkshop.net
http://www.adobe.com
http://www.actionxchange.com
http://www.phong.com
http://www.neofrog.com
http://user.fundy.net/morris
http://www.teamphotoshop.com
http://www.stridingstudio.com
http://monomaniac.neocyber21.net
이중에 하나입니다-_-
.................................................................................................

1 . 이미지를 하나 불러 옵니다.

2 . 이미지를 레이어로 만들고 ( 레이어 더블클릭 ) , 새로운 레이어를 만든후 이미지 레이어 밑에 둡니다.

3 . Image > Canvas Size해서 적당히 캔버스크기를 늘려 줍니다. ( 넓으면 좋겠죠? )

4 . Image > Rotte Canvas > 90 CCW해주고, 2번에서 새로만든 레이어를 흰색으로 채워줍니다.

5 . Filter > Distort > Shear해서 위처럼 해줍니다.
컴터가 다운됐다가 다시 했더니 투명부분으로 남아 있군요 : )

6 . Edit > Transform > Rotate해서 적당히 돌려봅니다.

7 . Edit > Transform > Perspective해서 오른쪽 빨간원이 있는 부분을 밑으로 드래그 해줍니다.

8 . 새로운 레이어를 만들고 제일 위로 올립니다.

9 . 전경색을 밝은회색으로 배경색을 검정색으로 지정해 줍니다.
10 . 그라디언트툴을 선택합니다. ( Linear Gradient, Foreground to Background )

11 . 새로만든 레이어에 화살표 방향으로 드래그 해줍니다.

12 . 레이어 위치를 이미지 밑으로 내려줍니다.

13 . 무브툴 ( V ) 을 이용해 밑으로 내립니다. 이제 좀 뭐 같군요...

14 . 그림자를 좀더 부드럽게 하기위해 Filter > Blur > Gaussian Blur 를 적용합니다.

15 . Edit > Transform > Distort해서 오른쪽 밑을 약간 내려줍니다. ( 이미지 참고 )

16 . 레이어의 투명도를 85%로 줍니다. ( 불투명도-_-;; )

17 . 완성품입니다...저는 상당히 맘에 드네요 ^___^
.................................................................................................
윗 강좌의 원천지 입니다. 하도 오래되서 어딘지는 정확히 모르겠습니다.
http://psworkshop.net
http://www.adobe.com
http://www.actionxchange.com
http://www.phong.com
http://www.neofrog.com
http://user.fundy.net/morris
http://www.teamphotoshop.com
http://www.stridingstudio.com
http://monomaniac.neocyber21.net
이중에 하나입니다-_-
.................................................................................................
댓글 5
-
카라
2002.02.24 11:46
안되는부분이 있으면, 코멘트 남겨주세요~ -
비보이
2003.07.22 08:48
앗.. 아직까지 코멘트가 읍따..-0-;;
조은 강좌 감샤함다. -
성훈
2003.09.01 23:54
웃웃~ 감사합니다~~~~~~ -
KTG
2004.04.05 21:44
이런거 찾구 있었는데 ㅎㅎ 감사~ -
고냉이 콱!
2006.07.17 16:47
오~감사합니다.멋져용^^
| 번호 | 제목 | 글쓴이 | 날짜 | 조회 수 |
|---|---|---|---|---|
| 공지 | 공지 강좌를 올리기전 공지사항을 읽어주세요 [12] | Eccen | 2004.12.15 | 55089 |
| 15 |
물 느낌의 텍스쳐 ( 배경같은.. ) 만들기 입니다.
[17]
| 카라 | 2002.02.21 | 23318 |
| 14 |
TV 스캔라인 만들기 입니다.
[2]
| 카라 | 2002.02.21 | 15059 |
| 13 |
스타버스트라고 하는군요.
[4]
| 카라 | 2002.02.21 | 15543 |
| 12 |
팝 도트 만들기
[9]
| 카라 | 2002.02.21 | 20449 |
| 11 |
그리드 만들기
[5]
| 카라 | 2002.02.21 | 14060 |
| » |
3D SHEET 만들기
[5]
| 카라 | 2002.02.21 | 645 |
| 9 |
플라스틱 또는 젤 느낌의 텍스트 만들기
[16]
| 카라 | 2002.02.21 | 22653 |
| 8 | [퍼니페인트]요즘 유행하는 볼록이 효과 [10] | funnyPSP | 2002.02.21 | 8473 |
| 7 |
[퍼니페인트] 메뉴 설명
[2]
| funnyPSP | 2002.02.21 | 7762 |
| 6 | [퍼니페인트]다음 로고만들기 [1] | funnyPSP | 2002.02.21 | 13828 |
| 5 | [퍼니페인트]그림에 바둑판 새기기 -초급- [7] | funnyPSP | 2002.02.21 | 9485 |
| 4 |
햇볕이 비추는듯한....음...태양의 코로나 같은 효과...^^
[24]
| 천민수 | 2002.02.21 | 1083 |
| 3 | 플래시 무비의 프레임률이 막 떨어질때, [16] | 유군-_-)/ | 2002.02.21 | 1655 |
| 2 | 구름만들기; [27] | Nㆍzna | 2002.02.21 | 872 |
| 1 |
[PHOTOSHOP]금속성 문자 만들기
[6]
| (_*_) | 2002.02.21 | 1208 |