웹마스터 팁
Ubuntu Server - SSH, APM, DNS, FTP 설치하기
2008.08.09 08:55
우분투 서버 버전에서 SSH, APM, DNS, FTP 서버를 구축해보겠습니다.(우분투 서버 설치는 생략 하도록 하겠습니다.)
우분투 서버나 데스크톱버전을 새로 설치 하다보면 루트패스워드가 지정되어있지 않습니다.
이럴때는 일반 계정에서 sudo로 패키지를 설치해야하는데 저는 sudo를 쓰기 귀찮아서 루트 패스워드를 지정해주고 사용하겠습니다.
루트 패스워드 설정
터미널에서 sudo passwd root 를 입력하면 원하는 루트 패스워드를 입력하시면 됩니다.
ruo91@yongbok:~# sudo passwd root
Enter new UNIX password:
Retype new UNIX password:
passwd: password updated successfully
1. SSH 설치
# apt-get install ssh
SSH는 기본 22포트를 사용하는데 이대로 사용 해버리면 SSH Bruteforce 즉 SSH 무작위 공격이 와서 해킹을 당할수도 있습니다.
그러므로 22포트를 다른 포트로 변경하여 사용하면 안전하지요...
vi /etc/ssh/sshd_config
# Package generated configuration file
# See the sshd(8) manpage for details
# What ports, IPs and protocols we listen for
# 아래 숫자를 원하는 포트번호로 수정
Port 3065
# Use these options to restrict which interfaces/protocols sshd will bind to
#ListenAddress ::
#ListenAddress 0.0.0.0
이후 ssh를 재시작 /etc/init.d/ssh restart
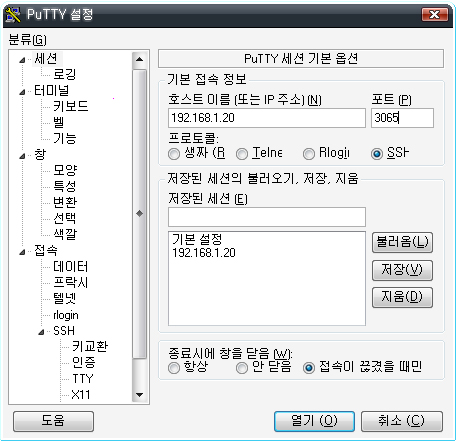
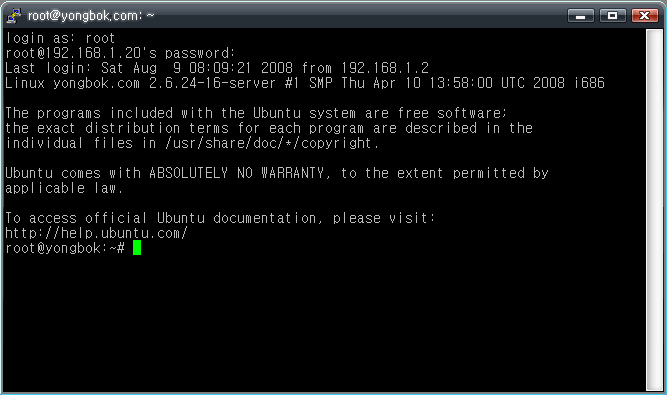
SSH 서버가 잘 동작하는지 PuTTY로 접속 PuTTY Download
PuTTY 접속 설정 화면
PuTTY로 서버 접속 화면
2. Apache2 설치
# apt-get install apache2
이후 vi /etc/apache2/apache2.conf 를 열어 맨 아래 부분에 ServerName localhost 를 추가
도메인이 있을 경우 localhost에 해당 도메인 입력
rewrite 모듈을 사용시 심볼링크로 해결
# cd /etc/apache2/mods-enabled
# ln -s ../mods-available/rewrite.load ./rewrite.load
3. PHP5 설치
# apt-get install php5 php5-gd
/etc/init.d/apache2 restart 로 아파치 재시작!
4. MYSQL 설치
# apt-get install mysql-server libapache2-mod-auth-mysql php5-mysql
설치후 터미널에서 mysql 묻는 창이 뜨면 패스워드를 적고 설치를 마친다.
--> mysql 접속
# mysql -u root -p
--> blog 데이터베이스 생성
mysql> CREATE DATEBASE blog; blog 디비를 생성
--> 사용자 계정 추가
mysql> GRANT ALL PRIVILEGES ON *.* TO '사용자명'@'localhost' IDENTIFIED BY '패스워드' WITH GRANT OPTION;
이제...APM이 잘 실행 되는지 테스트 해봅니다.
우선 /home 디렉토리에 www 라는 하위 디렉토리를 생성후 권한을 707로 줍니다.
# mkdir /home/www
# chmod 707 /home/www
아파치 가상호스트 설정을 합니다.
vi /etc/apache2/sites-available/default
#=======================================================================================
# 아파치 가상 호스트 설정
# SetEnvIf Remote_Addr 192.168.1.2$ do_not_log 192.168.1.2 아이피로부터 로그를 저장하지 않는다.
# Options FollowSymLinks 만약 지정한 디렉토리안에 index 파일이 없다면 원래 주소로 이동
# AllowOverride FileInfo 디렉토리의 목록을 보여주지 않음
NameVirtualHost *
# www 셋팅
<VirtualHost *>
ServerAdmin ruo91@naver.com
ServerAlias yongbok.com www.yongbok.com
DocumentRoot /home/www/
ErrorLog /var/log/apache2/www-error.log
LogLevel warn
SetEnvIf Remote_Addr 192.168.1.2$ do_not_log
CustomLog /var/log/apache2/www-access.log combined env=!do_not_log
ServerSignature On
<Directory "/home/www/">
Options FollowSymLinks
AllowOverride FileInfo
</Directory>
</VirtualHost>
#=======================================================================================
저장후 /etc/init.d/apache2 restart 로 아파치를 재시작!
/home/www 디렉토리 폴더에 index.php 를 생성하여 이 php파일에 <? phpinfo(); ?> 를 입력!
# cat > index.php
<? phpinfo(); ?>
여기서 Ctrl + D 눌러 cat에서 빠져 나온 후 index.php 권한 추가
# chmod 707 index.php
이후 사이트를 방문하여 php 정보가 나오는지 확인하면 되요~
5. DNS 서버 설치
bind9를 이용한 dns 서버 설치
|
root@yongbok:~# apt-get install bind9 root@yongbok:~# |
2. BIND9가 /etc/bind 디렉토리로 설치가 되었습니다. 해당 디렉토리로 가서 named.conf 파일을 열어 아래와 수정을 진행 합니다.
|
// This is the primary configuration file for the BIND DNS server named. zone "yongbok.com" IN { |
3. db-yongbok 파일을 하나 만들어서 아래와 같이 입력합니다.
(file.yongbok.com 처럼 들어가도록 만들려면 아래 처럼 계속 추가해주시면 됩니다.)
|
;; BIND data file for local loopback interface A 116.41.167.x |
4. ip-yongbok 파일 생성 후 아래와 같이 입력 해줍니다.
|
;; BIND data file for local loopback interface |
5. loopback-yongbok 파일 생성 후 아래와 같이 입력 해줍니다.
|
;; BIND reverse data file for local loopback interface |
6. BIND9 다시시작 /etc/init.d/bind9 restart
| root@yongbok:~# /etc/init.d/bind9 restart * Stopping domain name service... bind [ OK ] * Starting domain name service... bind [ OK ] root@yongbok:~# |
6. nslookup 도메인명으로 DNS 서버 변경이 되었는지 확인 합니다.
(1분안에 업데이트 하려면 $TTL 값을 1M 으로 수정)
root@yongbok:~# nslookup www.yongbok.com
Server: 168.126.63.1
Address: 168.126.63.1#53
Non-authoritative answer:
Name: www.yongbok.com
Address: 116.41.167.x
root@yongbok:~#
6. FTP 서버 설치
FTP 데몬은 vsftpd로 설치를 진행 하겠습니다.
# apt-get install vsftpd
vi /etc/vsftpd.conf
# Example config file /etc/vsftpd.conf
#
# The default compiled in settings are fairly paranoid. This sample file
# loosens things up a bit, to make the ftp daemon more usable.
# Please see vsftpd.conf.5 for all compiled in defaults.
#
# READ THIS: This example file is NOT an exhaustive list of vsftpd options.
# Please read the vsftpd.conf.5 manual page to get a full idea of vsftpd's
# capabilities.
#
#
# Run standalone? vsftpd can run either from an inetd or as a standalone
# daemon started from an initscript.
# standalone 모드로 사용
listen=YES
#
# Run standalone with IPv6?
# Like the listen parameter, except vsftpd will listen on an IPv6 socket
# instead of an IPv4 one. This parameter and the listen parameter are mutually
# exclusive.
#listen_ipv6=YES
#
# Allow anonymous FTP? (Beware - allowed by default if you comment this out).
# 익명 FTP로 사용 [기본값: YES]
anonymous_enable=NO
#
# Uncomment this to allow local users to log in.
# 로컬 유저의 접속가능 여부
local_enable=YES
#
# Uncomment this to enable any form of FTP write command.
# 로컬 유저가 파일 쓰기 수정 여부
write_enable=YES
#
# Default umask for local users is 077. You may wish to change this to 022,
# if your users expect that (022 is used by most other ftpd's)
# 로컬 유저가 FTP에서 폴더를 생성하면 자동으로 퍼미션 755
local_umask=022
#
# Uncomment this to allow the anonymous FTP user to upload files. This only
# has an effect if the above global write enable is activated. Also, you will
# obviously need to create a directory writable by the FTP user.
#anon_upload_enable=YES
#
# Uncomment this if you want the anonymous FTP user to be able to create
# new directories.
#anon_mkdir_write_enable=YES
#
# Activate directory messages - messages given to remote users when they
# go into a certain directory.
dirmessage_enable=YES
#
# Activate logging of uploads/downloads.
xferlog_enable=YES
#
# Make sure PORT transfer connections originate from port 20 (ftp-data).
connect_from_port_20=YES
#
# If you want, you can arrange for uploaded anonymous files to be owned by
# a different user. Note! Using "root" for uploaded files is not
# recommended!
#chown_uploads=YES
#chown_username=whoever
#
# You may override where the log file goes if you like. The default is shown
# below.
#xferlog_file=/var/log/vsftpd.log
#
# If you want, you can have your log file in standard ftpd xferlog format
#xferlog_std_format=YES
#
# You may change the default value for timing out an idle session.
#idle_session_timeout=600
#
# You may change the default value for timing out a data connection.
#data_connection_timeout=120
#
# It is recommended that you define on your system a unique user which the
# ftp server can use as a totally isolated and unprivileged user.
#nopriv_user=ftpsecure
#
# Enable this and the server will recognise asynchronous ABOR requests. Not
# recommended for security (the code is non-trivial). Not enabling it,
# however, may confuse older FTP clients.
#async_abor_enable=YES
#
# By default the server will pretend to allow ASCII mode but in fact ignore
# the request. Turn on the below options to have the server actually do ASCII
# mangling on files when in ASCII mode.
# Beware that on some FTP servers, ASCII support allows a denial of service
# attack (DoS) via the command "SIZE /big/file" in ASCII mode. vsftpd
# predicted this attack and has always been safe, reporting the size of the
# raw file.
# ASCII mangling is a horrible feature of the protocol.
#ascii_upload_enable=YES
#ascii_download_enable=YES
#
# You may fully customise the login banner string:
#ftpd_banner=Welcome to blah FTP service.
#
# You may specify a file of disallowed anonymous e-mail addresses. Apparently
# useful for combatting certain DoS attacks.
#deny_email_enable=YES
# (default follows)
#banned_email_file=/etc/vsftpd.banned_emails
#
# You may restrict local users to their home directories. See the FAQ for
# the possible risks in this before using chroot_local_user or
# chroot_list_enable below.
#chroot_local_user=NO
#
# You may specify an explicit list of local users to chroot() to their home
# directory. If chroot_local_user is YES, then this list becomes a list of
# users to NOT chroot().
#chroot_list_enable=YES
# (default follows)
#chroot_list_file=/etc/vsftpd.chroot_list
#
# You may activate the "-R" option to the builtin ls. This is disabled by
# default to avoid remote users being able to cause excessive I/O on large
# sites. However, some broken FTP clients such as "ncftp" and "mirror" assume
# the presence of the "-R" option, so there is a strong case for enabling it.
#ls_recurse_enable=YES
#
#
# Debian customization
#
# Some of vsftpd's settings don't fit the Debian filesystem layout by
# default. These settings are more Debian-friendly.
#
# This option should be the name of a directory which is empty. Also, the
# directory should not be writable by the ftp user. This directory is used
# as a secure chroot() jail at times vsftpd does not require filesystem
# access.
secure_chroot_dir=/var/run/vsftpd
#
# This string is the name of the PAM service vsftpd will use.
pam_service_name=vsftpd
#
# This option specifies the location of the RSA certificate to use for SSL
# encrypted connections.
rsa_cert_file=/etc/ssl/certs/ssl-cert-snakeoil.pem
# This option specifies the location of the RSA key to use for SSL
# encrypted connections.
rsa_private_key_file=/etc/ssl/private/ssl-cert-snakeoil.key
vsftpd 재시작 /etc/init.d/vsftpd restart
해당 로컬 유저로 접속되는지 확인
루트로 접속 하려면 vi /etc/ftpusers 를 열어서 root 를 주석 처리 해주시고 vsftpd를 재시작 해주시면 됩니다.
후후후... 허접 강좌...여기까지군요... 허접한 글 읽으시느라 수고하셨습니다.
PuTTY 다운로드 링크 출처 : http://kldp.net
- [2017/08/04] 묻고답하기 메모장으로 php 파일 수정 후 모바일에서 메뉴 깨짐 현상 *1
- [2016/12/18] 묻고답하기 XE 설치중 이상발생..APM문제? *2
- [2015/05/13] 묻고답하기 DB자동백업 XE에서도 될까요?.... *1
- [2015/01/09] 묻고답하기 Mac 용 SSH 추천(제발부디)부탁드립니다
- [2014/12/28] 묻고답하기 구글 검색가능, 서버, DNS설정 관련해서 조금 어려운 질문 드립니다. *7